Patchwork Boots

It's been a bit of a strange few days, and not much has gone to plan, but my Bernina has returned from its 'holiday' with nephew.
Whilst I love my Brother machines, they don't have the oomph that the Bernina has. I started making these boots a while ago, and now that Bernie is back, they've been finished ;-)
(Dont look too close, there are some dodgy sections!)
Birthday Baking
Ok, not quite baking, but I did make a cake
Confused?
You won't be when you see this cake that I made for my colleague at school, Sarah
 (hum, I must have taken the photo before I hand embroidered the candle wicks - you'll have to imagine them)
I usually make the cup of first coffee, as I get in about 10 minutes before her, so I put her coffee on it, then started work. Funnily enough, she knew straight away it was from me :-)
Confused?
You won't be when you see this cake that I made for my colleague at school, Sarah

I usually make the cup of first coffee, as I get in about 10 minutes before her, so I put her coffee on it, then started work. Funnily enough, she knew straight away it was from me :-)
Perfect Post 6
Oh My Gosh
I have to be the most spoilt person in blogland!
My latest Star of Africa Bee star arrived today, from Jen, the Quilter in the Closet (isn't that a fab blog title). Jen lives very near to Hollywood (!) and based her star on the famous stars set into the pavement in the Hollywood Walk of Fame:
 With my name, and a sewing machine hand embroidered onto it
With the extra 4 pieces that I cheekily asked the girls for, I get this liberated star, already to tessalate with the other yummy stars

But there was more ... This amazing mug caddy that Jen made - and then popped into Hollywood to buy a mug for! (see the daisy button that is the perfect match for the daisys on the fabric)

Then (as her lovely letter explained) she saw another mug that she thought would be ideal, but clearly wouldn't fit in the caddy, so I got BOTH mugs
 (how great is that!)
But the mugs then had to be protected from postal machines etc, so they were wrapped in two fabrics. The batik is an amazing intricate design, but the "Evolution" fabric is heart-stoppingly gorgeous. I'm not sure I'll ever be able to use it, I think it has to be framed (but that's ok, because Jen sent me a piece with this image TWICE)

So if anyone out there in blog land has had a better delivery thisweek, month, year! I'll eat my hat!
I have to be the most spoilt person in blogland!
My latest Star of Africa Bee star arrived today, from Jen, the Quilter in the Closet (isn't that a fab blog title). Jen lives very near to Hollywood (!) and based her star on the famous stars set into the pavement in the Hollywood Walk of Fame:

With the extra 4 pieces that I cheekily asked the girls for, I get this liberated star, already to tessalate with the other yummy stars

But there was more ... This amazing mug caddy that Jen made - and then popped into Hollywood to buy a mug for! (see the daisy button that is the perfect match for the daisys on the fabric)

Then (as her lovely letter explained) she saw another mug that she thought would be ideal, but clearly wouldn't fit in the caddy, so I got BOTH mugs

But the mugs then had to be protected from postal machines etc, so they were wrapped in two fabrics. The batik is an amazing intricate design, but the "Evolution" fabric is heart-stoppingly gorgeous. I'm not sure I'll ever be able to use it, I think it has to be framed (but that's ok, because Jen sent me a piece with this image TWICE)

So if anyone out there in blog land has had a better delivery this
Someone's Stocking
OK, not stockings, but Someone's Sack didn't have the same ring to it!!!
I had a few customers ask me to make Christmas Sacks last year: they thought they asked in plenty of time, but as I was going to spend the first 17 days of December in Australia, I had to tell them I couldn't help, so this year I am getting ready early.
I have changed the design slightly so I can get them prepared before personalising them, so decided to make one for our new Great Neice, so I could photograph it:
So, Dear Santa, this year I have been good, Lucia

But if trouble is afoot, and Santa needs to be aware, the tab can be flipped over:

I have an image of, in a few years time, mum or dad shouting to Lucia "Dont make me turn the tab around"
I had a few customers ask me to make Christmas Sacks last year: they thought they asked in plenty of time, but as I was going to spend the first 17 days of December in Australia, I had to tell them I couldn't help, so this year I am getting ready early.
I have changed the design slightly so I can get them prepared before personalising them, so decided to make one for our new Great Neice, so I could photograph it:
So, Dear Santa, this year I have been good, Lucia

But if trouble is afoot, and Santa needs to be aware, the tab can be flipped over:

I have an image of, in a few years time, mum or dad shouting to Lucia "Dont make me turn the tab around"
Foot Free and Fancy Loose
Have you ever tried FMQ without a foot?

I roped mum and Jackie in to help me, we stretched and bullied it into a neat rectangle, and pinned and tacked the rectangle onto a sheet, and I then started to quilt it by hand.
However, what we hadn't considered was that the stretched bits didn't really want to stay stretched, so they were springing back to their original shape, and taking the sheet with it.
I had long discussions with the Broom Farm ladies, and the final decision was to spray baste it, in it's preferred shape, onto a fleece blanket (in fact two joined to be big enough) and then quilt it along the seams.

Do you want to see the blanket?
Are you sure?
Ta da!

A Few Finishes
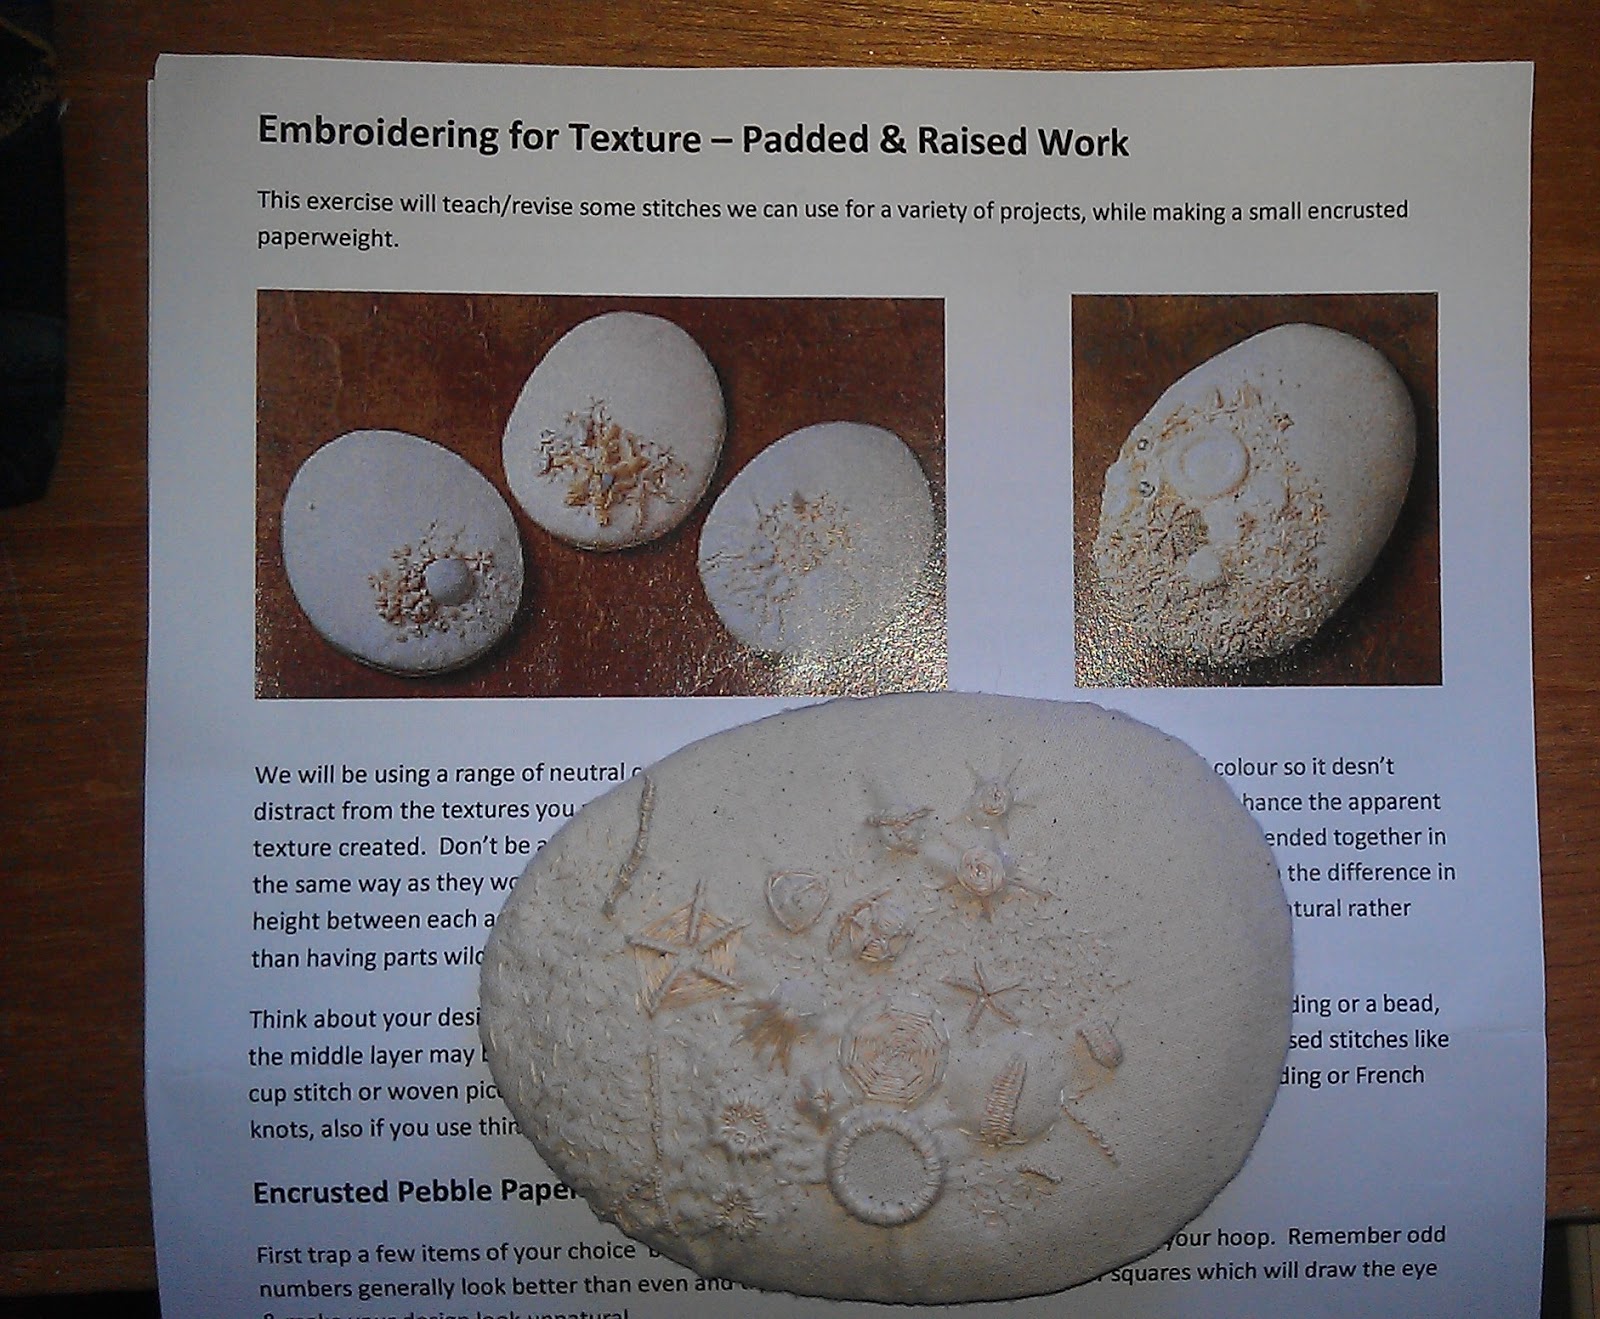
Last month a friend, Jacqui, lead the group at Chertsey Museum, and taught us how to do Padded and Raised work, She used the theme of a rock pool, and gave us a number of examples.
I've finally finished mine


I have also finished stitching on the binding for a Batik Square Dance that has been in the PHD pile for far too long.

To keep me on track I have written a list of projects to be finished before Christmas: at least the Square Dance can be my first tick!
I've finally finished mine

I have also finished stitching on the binding for a Batik Square Dance that has been in the PHD pile for far too long.

* * * * * * * *
To keep me on track I have written a list of projects to be finished before Christmas: at least the Square Dance can be my first tick!
- Christmas Waistcoat
- I-Spy for Dina
- I-Spy for Liz
- I-Spy for Jane (Chloe)
- Christmas sack for Chloe
- Christmas sack for Richard
- 12 place mats for Carol
- 2 Pairs of Patchwork boots
- Warm Stars quilt for Philippa
- Christmas Tree by Candlelight wall hanging
- Napkins for Anna
Batik Square Dance 18th November)
Perfect Post 7 and 8
Well, the delivery I can blog about today was one delivery from two people!
Tina and Veena, both from the Star Of Africa Bee, both live in India. Veena was recently rushed into hospital for an operation, so Tina stepped in to help with my block. These two blocks arrived from both Tina and Veena, and I love them both. I told the group that I was choosing grey as the linking fabric as next March is our silver wedding anniversary, so my Bee buddies are helping me make an anniversary quilt. I wasn't particularly thinking that the blocks were to represent weddings, as the blocks are already to represent our locality, but Veena and Tina have managed both!
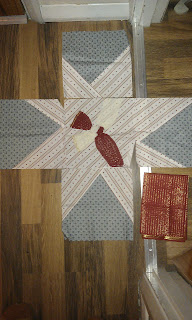
Tina writes about this one
Benta, since this is for your wedding anniversary, here's something from our weddings. The garments of the bride (red) & groom (white) are tied with the sacred marital knot throughout the duration of the wedding ceremony. Isn't that cute? Another interesting bit - when the man turns 60, the couple take their wedding vows once more in another 'wedding', this time with the kids and grandkids around too :-)
 If you follow this link to the flickr group you can see a much better photo of it
This second block also has a wedding theme
 Veena writes that it represents two palms decorated with henna. This is painted onto the hands of married women
Both blocks are beautiful.
Thank you both for the blocks, and for the fabrics you kindly sent too. Veena, I hope you feel better soon x x
Tina and Veena, both from the Star Of Africa Bee, both live in India. Veena was recently rushed into hospital for an operation, so Tina stepped in to help with my block. These two blocks arrived from both Tina and Veena, and I love them both. I told the group that I was choosing grey as the linking fabric as next March is our silver wedding anniversary, so my Bee buddies are helping me make an anniversary quilt. I wasn't particularly thinking that the blocks were to represent weddings, as the blocks are already to represent our locality, but Veena and Tina have managed both!
Tina writes about this one
Benta, since this is for your wedding anniversary, here's something from our weddings. The garments of the bride (red) & groom (white) are tied with the sacred marital knot throughout the duration of the wedding ceremony. Isn't that cute? Another interesting bit - when the man turns 60, the couple take their wedding vows once more in another 'wedding', this time with the kids and grandkids around too :-)
(should be twisted anticlockwise):

This second block also has a wedding theme

Both blocks are beautiful.
Thank you both for the blocks, and for the fabrics you kindly sent too. Veena, I hope you feel better soon x x
No Reply? No Problem!
Just a short post today - I had a lovely visit from Lisa: she planned to be here just until 2pm, but stayed until 9:30, lovely but no sewing time today.
I did get a little niggle sorted. Fiona at CelticThistleStitches told me that I was suddenly posting as a No Reply blogger, but I couldn't find the setting to change it. Fiona suggested it might be caused by Google Plus. Eventually Mr Google helped by leading me to this blog page:. From Me And My Gang. The author shows how to disconnect Google Plus, how to change settings, and then how to return to Google Plus.
Apologies for being a No Reply blogger. All sorted now
I did get a little niggle sorted. Fiona at CelticThistleStitches told me that I was suddenly posting as a No Reply blogger, but I couldn't find the setting to change it. Fiona suggested it might be caused by Google Plus. Eventually Mr Google helped by leading me to this blog page:. From Me And My Gang. The author shows how to disconnect Google Plus, how to change settings, and then how to return to Google Plus.
Apologies for being a No Reply blogger. All sorted now
How Generous is Janine? (Perfect Post 9)
You may remember me having blogged about Janine (The Rainbow Hare) before. She and I have been following each other's blogs for a long time now. She made this fab hexie spiral mini quilt

earlier this year, and very kindly sent me the books so I could make one myself,and she and Nicky (Mrs Sew and Sew) blogged about the Star of Africa Bee which I then joined.
Janine's Bee Block arrived a few days ago, but I was feeling so full of cold, and achy and generally bleugh, so I made myself wait until today before I opened it. It was lovely to have something to look forward to even though I had already seen the block when she posted it on FlickrL
The Out Of Africa Bee Blocks each represent something from our own locality, and while my geography is rubbish, I recognised this block as soon as I saw it: The White Cliffs of Dover

And here it is in the centre of it's star
 Thank you Janine
But before I even came to the star blocks, I shrieked.
Seriously! Its so lucky there was no-one else home as they probably would not have understood - but you - my bloggy patchworky friends will understand.
You understand that when a stranger (lets face it, Janine and I have never met) sends you not only a lovely block, but also something beautiful, intricate and painstakingly made, and in this case something also previously lusted after, there is no correct response other than a loud, girly shriek
Prepare yourselves
This is now mine
 Words cannot describe how I feel, but I tried - I found Janine's phone number through BT.com, and called her to thank her. We had a lovely long chat, and Janine, I hope you realise how delighted I am!
Slightly paling into insignificance, I have done *some* sewing today, and this misshapen collection of Christmassy blocks is the result.

It might be clearer from this side

Tomorrow I am meeting mum for a spot of Christmas shopping, and I will pass these pieces over to her, and when I next see her (if she has taken a break from the cardigan she is knitting me) she may have made me a Christmas Waistcoat!
Thank you mummy!
So the Christmas List:

earlier this year, and very kindly sent me the books so I could make one myself,and she and Nicky (Mrs Sew and Sew) blogged about the Star of Africa Bee which I then joined.
Janine's Bee Block arrived a few days ago, but I was feeling so full of cold, and achy and generally bleugh, so I made myself wait until today before I opened it. It was lovely to have something to look forward to even though I had already seen the block when she posted it on FlickrL
The Out Of Africa Bee Blocks each represent something from our own locality, and while my geography is rubbish, I recognised this block as soon as I saw it: The White Cliffs of Dover

And here it is in the centre of it's star

But before I even came to the star blocks, I shrieked.
Seriously! Its so lucky there was no-one else home as they probably would not have understood - but you - my bloggy patchworky friends will understand.
You understand that when a stranger (lets face it, Janine and I have never met) sends you not only a lovely block, but also something beautiful, intricate and painstakingly made, and in this case something also previously lusted after, there is no correct response other than a loud, girly shriek
Prepare yourselves
This is now mine

Slightly paling into insignificance, I have done *some* sewing today, and this misshapen collection of Christmassy blocks is the result.

It might be clearer from this side

Tomorrow I am meeting mum for a spot of Christmas shopping, and I will pass these pieces over to her, and when I next see her (if she has taken a break from the cardigan she is knitting me) she may have made me a Christmas Waistcoat!
Thank you mummy!
So the Christmas List:
- Nicky's book block
- I-Spy for Dina
- I-Spy for Liz
- I-Spy for Jane (Chloe)
- Christmas sack for Chloe
- Christmas sack for Richard
- 12 place mats for Carol
- 2 Pairs of Patchwork boots
- Warm Stars quilt for Philippa
- Christmas Tree by Candlelight wall hanging
- Napkins for Anna
Batik Square DanceChristmas Waistcoat
A 'Nearly Finish'
"Warm Stars" has been quilted

and bordered, and half bound,

and despite a panic that I didn't have enough of the second border fabric, has come out quite well

Just need to hand stitch the binding and she's done!

and bordered, and half bound,

and despite a panic that I didn't have enough of the second border fabric, has come out quite well

Just need to hand stitch the binding and she's done!
Another Finish from the Christmas List
One of the teachers at school is leaving on maternity leave. I had it in my head that it was at the end of term, so I have an I-Spy quilt on the list, but no rush . . . Until I was told that she leaves at the end of this month!
Gulp. Luckily I did have the blocks cut and stitched into strips, so a quick quilt as I go (my method which really is quick!) and add a binding, and it's now done
Panic over

The To Be Done By Christmas list now looks like . . .
Gulp. Luckily I did have the blocks cut and stitched into strips, so a quick quilt as I go (my method which really is quick!) and add a binding, and it's now done
Panic over

The To Be Done By Christmas list now looks like . . .
- Nicky's Book Block (Out of Africa)
- Janine's Butterfly block (Out of Africa)
- I-Spy for Liz
- I-Spy for Jane (Chloe)
- Christmas sack for Chloe
- Christmas sack for Richard
- Christmas sacks for Liam and Harry
- 12 place mats for Carol
- 2 Pairs of Patchwork boots
- Warm Stars quilt for Philippa
- Christmas Tree by Candlelight wall hanging
- Napkins for Anna
Batik Square DanceI-Spy for DinaChristmas Waistcoat
Three finishes on my List
The first finish hadn't actually made it *to* the list, so I've added it and crossed it off, which is a very happy feeling. These are made 'in the hoop' - which kind of means I do a little bit of work on the computer and the press go on the embroidery machine and it does all the hard work! A whole load of little 'thinking of you at Christmas' gifts sorted

This is an I-Spy quilt for a friend who has just become a Great Auntie to a baby called Chloe. Her name is embroidered on the ballet fabric, but you can hardly see it.

And while watching the first half of the Bone Hunter last night I finished the binding on Warm Memories and Stars - this may be for a teacher leaving school at the end of the year. I have two finished and they can now go to school where someone with decision making abilities can choose!

So the new and improved list now looks like this:

This is an I-Spy quilt for a friend who has just become a Great Auntie to a baby called Chloe. Her name is embroidered on the ballet fabric, but you can hardly see it.

And while watching the first half of the Bone Hunter last night I finished the binding on Warm Memories and Stars - this may be for a teacher leaving school at the end of the year. I have two finished and they can now go to school where someone with decision making abilities can choose!

So the new and improved list now looks like this:
- START Nicky's Book Block (Out of Africa)
- START Janine's Butterfly block (Out of Africa)
- START Christmas sacks for Liam and Harry
- START 12 place mats for Carol
- START 2 Pairs of Patchwork boots
- FINISH I-Spy for Liz
- FINISH Christmas sack for Chloe
- FINISH Christmas sack for Richard
- FINISH Christmas Tree by Candlelight wall hanging
- FINISH Napkins for Anna
Batik Square DanceI-Spy for DinaChristmas WaistcoatIn The Hoop GiftsI-Spy for Jane (Chloe)Warm Stars quilt for Philippa


