Tuesday, August 31, 2010

2010 August (3)


Kate's SAH Robin

Last year at Festival Of Quilts I bought LOADS of whites with black, and blacks with white.

The mostly whites went with some pale greens into a quilt for Niki's friend Kay:

The mostly blacks went, with some pale blues, into a quilt for Niki's friend Becca


Both types, plus a bit of red, went into log cabins which became cushion covers for Niki herself:
and the remaining fabrics plus a few orphan log cabins went into a plastic bag awaiting inspiration.

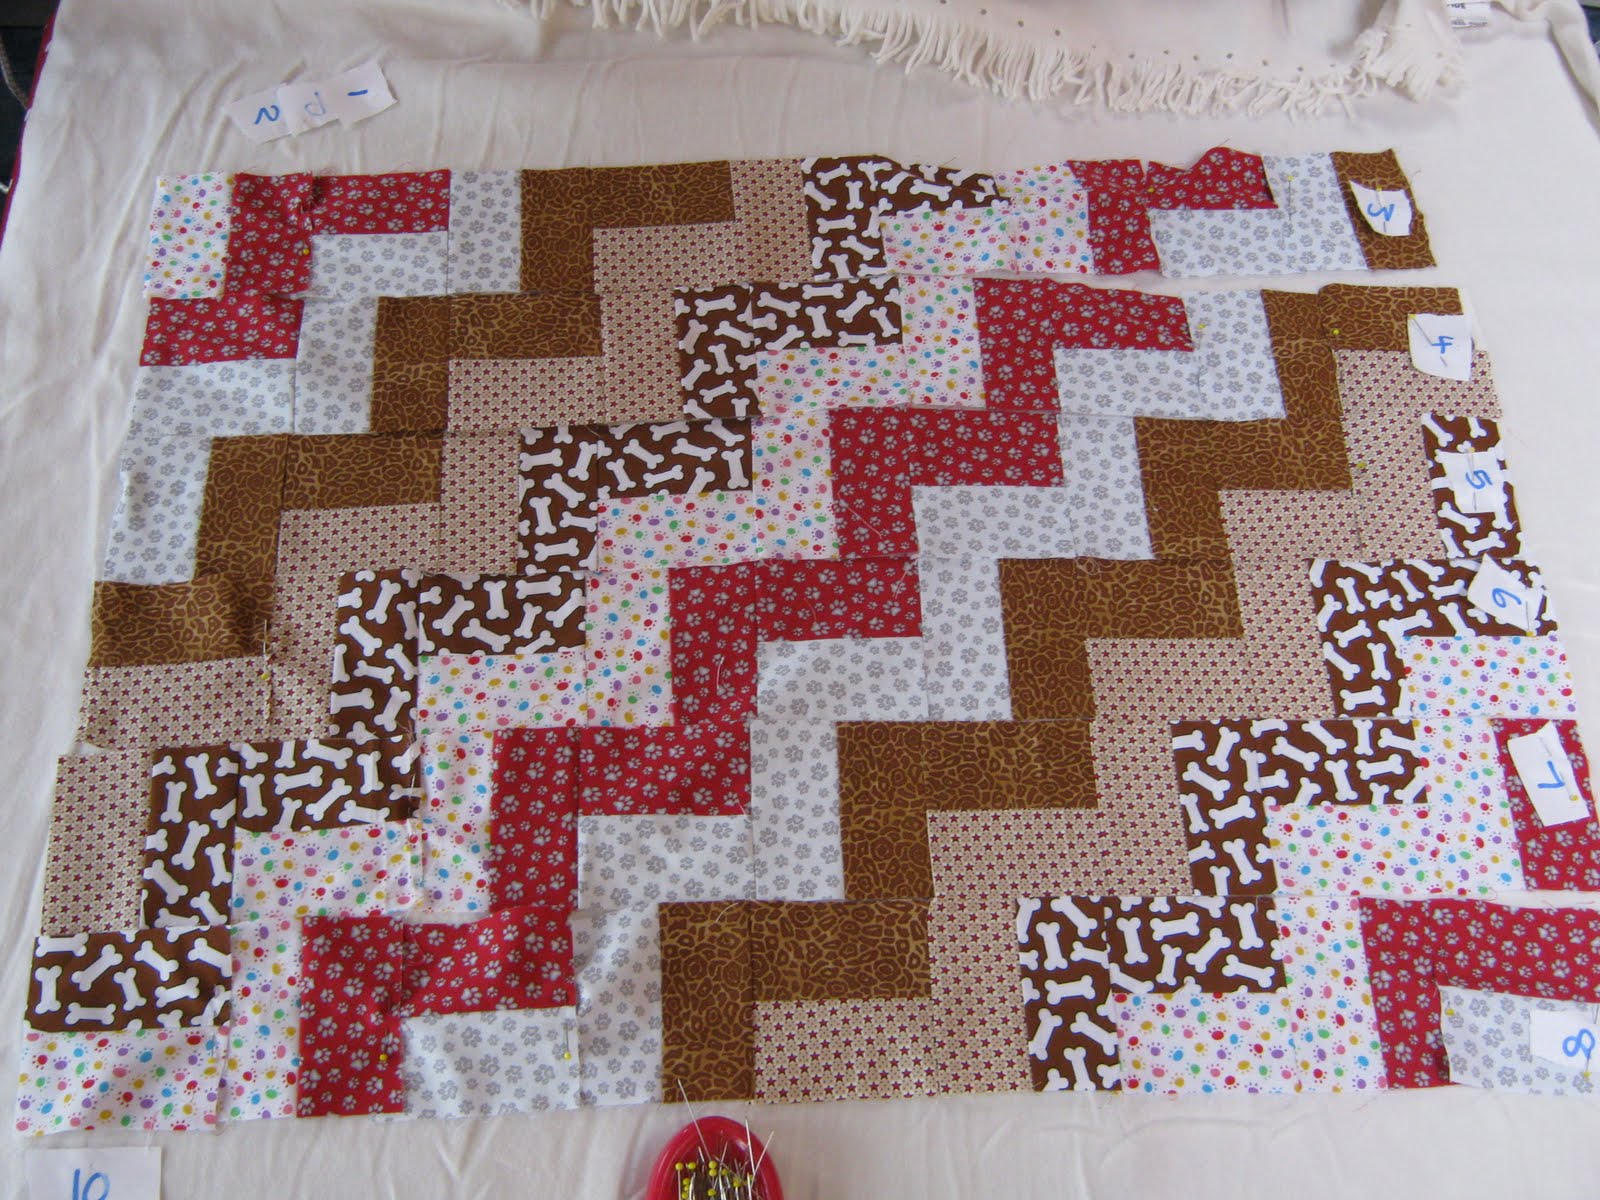
One of the blogs I've been following is Kates's Quilting Blogspot where she is hosting a Stay At Home Round Robin. We'll I've finally plucked up the courage, and I've used an orphan and some scraps to catch up with the first two stages, and now I'm off to ask Kate, Pretty Please, can I be in your gang?

Sunday, August 15, 2010

2010 August (2)


Slik and Quick Quilt as you go (Tutorial)

I was making patchwork quilts for many years before it occurred to me to get a book or attend a lesson. Instead I looked at quilts and thought about how it was probably made, and set off to do the same thing.It was only when I started to attend lessons that I discovered that my way wasn't the same as the taught way! However, I still use my way in a lot of cases - and my Quilt as I go is a case in point.

I have made all my blocks and have stitched them together in rows, and checked they are all still correct, and have numbered them. Now I can Quilt as I go. For this tutorial, I am working on a quilt with 6 panels. An odd number of panels is slightly different (*).

Prepare the other layers of the quilt. If this is backing fabric and wadding (batting) put the backing fabric face down on the table, smooth out any creases and put the wadding on top. (you can use spray adhesive to hold these together, pins, safety pins, tags, or trust) If you are using fleece, put the fleece on the table nice side down, and smooth the fabric.

Find and mark the middle of the backing. Place a pin at the middles of the edges. Take your two middle strips (numbered 3 and 4 in my example), and place the lower numbered one (ie 3 in my case) 1/4 inch past the middle.

Pin the next strip (number 4 here) to it, along the centre of the backing, matching the seams.


Open out the new strip and double check that the pattern is correct. Stitch, making sure you use locking stitches at either end


Press open, and now add strip 2 to strip 3 and strip 5 to strip 4 in the same way, finishing by adding strip 1 at the beginning and strip 6 at the end. Press open


The following photo shows the back. You can see the stitch lines running from left to right - well that is the first half of your in-the-ditch quilting done. All you now need to do is whizz along the other seams (perpendicular if we are being pedantic!) and the whole piece has been quilted in the ditch and you can now get on with adding your borders :-)

From mini jelly roll to this took me a morning - so quick and so satisfying

Enjoy!!!
(* for an odd number of strips, position the middle one down the middle of the backing, and pin the strip immediately before it and immediately after in into place. Stitch and continue as above)

Thursday, August 5, 2010

2020 August (1)


Serendipity


Well the most exciting thing has happened! I was pondering just how many fat quarters of dark green I would need to buy to make the Christmas Tree quilt [click here for original blog] and would I need as much as a FQ? Scraps would be fine. Then on BQL there was a discussion about the badge designed for people to wear to recognise each other at exhibitions etc, and a lady asked where she could find the badge. I directed her, but added that I was happy to stitch one if she, or anyone else wanted one. It was only when a request came for a badge offering fabric in exchange that the lightbulb went off in my head. I have now made badges for 8 BQLers, and have them ready to go in the post - and am waiting for addresses for another five and then should get 13 envelopes with assorted dark greens for the tree!!!

I LOVE BQL!!!

(of course that means nothing from the to-do list today, but I'm too excited to be bothered!!!)

AND... I've managed to add a photo to my profile, and add a link to Amy's Blogger's Quit Festival - how hi-tech am I???


BQL badges for fabric swap


Well I have posted 13 badges ... and the first three fabric packs have arrived (thank you Mr postie :-)

So exciting, and fabrics that I haven't even seen before - this quilt will be awesome!!!

Thank you Lillian, Lis, and Pascale.

I have found the details of the quilt that inspired me, and have added it to the original post [here]

Rosemary's Jig Saw quilt


This quilt was pieced for me by a lovely lady called Rosemary ... she made this quilt top for me and I embroidered a poem onto fabric for her, so a trade - which certainly left me very happy, and I hope it was a good result for her too. I don't have any photos of the embroidery, but I have finally remembered to take a photo of the jig saw quilt with my two moggies sleeping on it! This is the fist quilt that I have hand quilted - we went to Bath for the weekend in May and I echoed the seams. i so loved the effect that I carried on with several echos on the all black squares. Thank you Rosemary!


A Spa Break

A few days away from the sewing machine as I went away for a girly Spa break with some old friends - lots of food and a few drinks, lots of pampering and an awful lot of chatting and putting the world to rights! The hotel was fab, and we had a birthday celebration by the side of the pool.


I have now finished the blue quilt for Patrick, and can deliver that tomorrow.


Somehow, I seem to have spent the rest of today tidying the sewing room - heaven knows it's not big, so who knows where the stuff comes from!!!


More Christmas Tree log cabin fabrics

While I was away at the Spa, Mr Postie delivered five (yes, FIVE!!!) more packages of fabrics - but my family had dumped them on the back of the sofa and neglected to mention it!


So when I finally tided up I found the packages - what a reward for being tidy, I wish life was always like that :-)


Thank you to Irene, Plum, Nik, Carole and Maureen

Just a few more commissions to finish and then I am allowed to start!


JOURNAL QUILTS
(or Quiltlets based loosely on Journal Quilts)

Oldest daughter is off to Uni in September, and although she doesn't sew much, she cannot imagine being in an environment where she doesn't need to watch for pins, where clothes don't come with added loose threads, and where irons are used for clothes ... so she is taking the old sewing machine with her. She doesn't want to make quilts, so we have been looking at journal quilts,


And I got a bit carried away making samples for her! These are all A4 size, stitched onto pelmet vilene

(L to R: 1cm squared, glued then FMQ / woven ribbons / hint of a rainbow / looking out to sea)

To now take it one stage further (I don't have enough on my to-do list evidently) I have joined the BQL PostCard swap, and will have to make 6 pink themed cards for the end of September, and Window themed for the end of October - hum, best get thinking :-)


Log Cabin Candles

I'm making these up as I go along, but thought I'd also have a go at writing a what-to-do (or what-not-to-do) blog as I go along, so if I put them to one side for a while I'll remember what I've learnt!

I started with (for each candle) a piece of yellow about 5cm square, and four smaller rectangles of dark green. Each green was placed (one at a time) in a corner of the yellow (right sides together) and stitched diagonally, so the bigger half could be flipped open. [start stitching from the centre of the shorter sides to give a better flame point, and remember to set the needle to central, so it stitches where I expect it to!!!]


This creates the flame
[Although the flames that started life as a rectangle have a better shape]


The candle is a piece of cream fabric about 4cm x 10cm (my Grandfather's Christmas tree always had real candles on it, and always white or cream) attached at one end of the candle (try auditioning to see which end looks best)


[all measurements here are very approximate - I haven't used a ruler or even a rotary blade for any cutting, just scissors by eye. But do trim excess after each addition]


I then started adding random strips of dark green.
In fact I think the design is more court house blocks [add to each side, then each end, then each side etc] rather than log cabin, but if there are such things as Quilt Police, this is a minor crime compared to many of my others!]

Sometimes it's easier to visualise something drawn out for paper piecing: Although I don't much like paper piecing, this should remind me roughly what I did!

These seams do need to be pressed, but I got away with finger pressing the flame seams, and then ironed all 4 open, ironed the candle in place, and then ironed each pair of logs (OK, steps if we're being correct!)


And here are the first 6 candles: You may need to squint to see the candle (or am I being overly critical?) but the quilt will hang from the top of the stairs so will be seen from a distance and I think it will look fine


I can finish a baby blanket


"Baby Andrews' " quilt has been at the top of my to-do list for ages, even though the quilt was finished in time for the village fair Craft Show back mid June (it came second :-). But it couldn't be finished until the baby arrived. She finally arrived yesterday, and Lora and Neil have called her Sky, so I am now able to embroider her name and finish the blanket - yippee!!!


The quilt is an I Spy quilt - 24 different picture fabrics, backed with warm cosy fleece, and unusually for me, 100% hand stitched ... I took the squares away on holiday in June to join them, and carried on hand sewing the blanket stitch around and the quilting in the ditch

Added later: and I have a lovely Thank You message from mum: Benta, the quilt you made for Sky is gorgeous, I have to admit I had a little cry when Neil brought it home. I had no idea you made them proffesionally, and it's so lovely. Thank you so much. We're planning to go to the church garden party with her so hopefully we'll see you there, otherwise as soon as we're in the house please please come over and meet her x x x


Paw Prints


Another (almost) tick on the to-do list, and another £25 to spend at Festival of Quilts next weekend!!!

These car seats are for a friend of a friend who is a dog groomer. I've done t-shirts for her before, and now she wanted car seat covers done. The head rests were really fiddly. I've done the front seats, and delivered them, but she wants the back seats doing too, so the project will have to stay on the list for now.

At least I have delivered something to her. Oh and I did one of the school PE kits, so I can move that off the list


My Special Boy's Quilt

If there is anyone in blogland reading this, I want to tell you about my Special Boy. I am employed by the borough to provide some respite childminding for a young lad (8 years old) who is autistic. There are other problems in the family too: mum has mental health problems, and she and dad have split up and aren't talking. So R has been coming to us for 6 hours one day at weekends and school holidays. Anyway, he has now been moved away from mum, as she was really having problems coping with parenting, and is with a foster family, possibly being moved to dad at the end of next month.

We will all miss R and his funny ways, even his obsessions. We want him to remember us, so I am making him a very personal I Spy quilt. Some of the fabrics were chosen by him, and the embroideries will hopefully help him with 'spiral learning' - prompts and reminders, together with a nod to some of his obsessions! These include blue Boy (our budgie) and the washing machine (a favourite noise, and we 'read' the words waiting for "suh, puh, ih, nuh" which is the best noise of all)

We also have a pet hedgehog, called Twiglet.

A regular Saturday trip is to my mother-in-law's where there is an old, red trike that Niki taught R how to ride. If anyone mentions nanny Bette he will, without prompting, recite the road numbers (M25, A40 etc) to get to hers, and finish with, breathlessly, "And she's got my red bike hasn't she"


The last two squares for today show our main teaching project of LEFT and RIGHT, and one of the donkeys who live at the village farm: Ruth (who appears in the church Christingle service each year and has been in Eastenders!!!)


(methinks I could have ironed these before I photographed and posted, ooops!)


Easy Zig Zag (tutorial)

I woke up this morning with an idea that I just HAD to try. I bought a small jelly roll last year and it's been sitting on the shelf, looking at me and I couldn't decide what to do with it, until today.I love zigzag quilts, but I think I'm allergic to triangles, so here is a lesson in a triangle free zigzag!

1. Assuming the mini jell roll has two of each colour, arrange the fabrics into two identical piles: light / dark / light / dark etc. (if there is just one of each fabric, cut each length into two shorter lengths.)2. Start to join the strips lengthwise: join fabric 1 to fabric 2, then from the other pile, join fabric 2 to fabric 3, then back to the first pile to join 3 to 4 etc, until you have the last fabric and the first one left: join these

3. Press all pairs towards the darker side. (I put the folded pair down, dark side up, seam away from me, and then lift the dark side like a page in a book, and use the tip of the iron to lift it further and press the seam)

4. Measure the height of your pressed two-colour strip. This is the measurement of your eventual square. Mine were 4.5 inches high, so I cut each strip into 4.5 inch squares


5. Lay out the squares so they start to build up the zigzag pattern. First I worked diagonally, which would give a straight zigzag,

but unless I wanted a zigzag edge to the quilt, I would have to trim off the triangles, and I didn't want to waste any fabric. Instead, I turned the squares so the zigzag runs diagonally, but the squares didn't need trimming (clear as mud? They say a picture is worth a thousand words)


6. Once you are happy with the arrangement, pin the squares in rows, each square to the one above and the one below. Put the strips back in the right order. Check and double check they are all correct (guess why I suggest this!)

7. Pin a number to each strip so you know its place for later


8. Stitch all the squares as pinned, and press to darker side

9. Pin all the strips together in the right order (unless you are using the Slik and Quick quilt as you go method)

10. Ta da - one pieced zigzag quilt, no triangles, and no fuss ;-)


2024 February

Hi, here is this month's summary! I finished my Christmas wool crochet blanket, I love the colours.  I ended up deconstructing the varie...