Showing posts with label advent calendar. Show all posts

Friday, December 31, 2021

2021 Week 52

Happy New Year to all

I must have been a good girl in 2021 as I was very spoiled at Christmas:

My little gang of Ginger Fans in the villages outdid themselves!  Look at the awesome Gingers I received from them!!!!


This cross stitched card from Niki

These awesome goodies from Jim, Plum, Jackie, Niki and Kathy: things made for me and things to make!  Thank you all so much!!!!


And this advent calendar stocking from Sharon (must take a pic of the finished version)


In other news: Niki and I helped with Meals on Wheels on Christmas Day - and she got cuddles with Monty and that made her day!


Lisa was trying to finish Niki's Christmas pressie: a heavy (t-shirt yarn) crochet blanket but the cats had other ideas!

(Niki loves it !)


And so does Thor!!!

Photos of this years' (and last years') Julenissen flooded into my inbox and social media - it makes me so happy to see them!


Thanks to Alice I have now sussed crochet "magic circles" and have started on squares for a blanket using up oddments from my previous blanket

And I made a decision about my not-enough-wool-to-make-a-big-shawl-but-not-enough-money-to-buy-more-skeins problem. I overlapped the ends and stitched them in place so I have a cowl/scarf and I might have ordered some variegated wool and a pattern to make a big multicoloured shawl at far less cost than even the skein I bought so far of the original plan!!!


Saturday, October 12, 2019

2019 Wk 41 - Working with Jackie

Working (ie sewing) with Jackie . . . and shopping with Jackie at the Alexandra Palace Knitting and Stitching show makes for a pretty fab weekend!

We made a couple of 'Fold Up Sewing Folio's from Aneela Hoey's Stitched Sewing Organisers book (we had to put an elastic strap on as we didn't have enough fabric for the fastening strap)

And these Stash and Go drawstring bags

(the mint zippie was a repair for oldest daughter)


The lovely Kathy sent us instructions on how to make her Japanese Eco market tote bag and we made these


These pouches came from this blog and although they took more than the promised ten minutes, they were really quick to make

These Handy Fold-up pouches also came from Aneela's book

and prompted this larger i-pad sized version

And finally we made Emmaline's retreat bag (just one got photographed!)

Not bag for really just a day and a half of sewing as we also spent a day at the Knitting and Stitching show!

I bought some great iron on plastic from Happy Fabric (this is my first test piece)

and some felted sheets to line some tube mittens

Some additional shades of pearle quilting threads, and some Advent calendar ribbons, together with some felt that is a bit more 'gingerbread man' coloured

And a skein of sari scraps with should allow me to make a scarf like this one

Friday, August 7, 2015

Fun in the Sun

I had a great afternoon at Chertsey Museum this afternoon, not many ladies as it's holiday season, but it meant that I could play too!
 
I did a short talk about advent calendars - I'd managed to forget my own samples

But a lovely colleague at school lent me two that I did remember to take, so we looked at lots of different possibilities (thanks Anna)

And then we started to play!  The fabric marbling kit was coming to an end: the chemicals to prepare the fabric and to create the base for the paints to float on have now been used up, so we kept going until the very last piece of prepared fabric was used, then threw the dregs of the paints away, but we've created some fab pieces
  

 I'm not sure that photo collage shows just *how* much fabric we marbled!  This pic shows more of it!

Our next challenge is to make things out of our fabrics! 

Friday, April 17, 2015

Christmas Crafting


Some of you are new visitors, popping over from the Ho Ho Ho and on We Sew link party - welcome.  Others are regular visitors - and if you haven't yet met Fiona and Paula and the other Ho Ho Ho-ers, do pop over and make their acquaintance.

They are on a mission to put a stop to the last minute sewing that all too often happens during December, and are encouraging us to take it easy, making bits and pieces throughout the whole year.

For those of you new to the Link Party, the posts are scheduled for the 18th of every month and the Link Party remains open until the end of the month to give our fellow bloggers lots of time to link up their Christmas and Holiday makes.

As well as encouraging us, there is a whole schedule of posts of Christmassy ideas to help us out
JanuaryCeltic Thistle StitchesFionahttp://celticthistlestitches.blogspot.com
FebruaryThreading My WayPamhttp://www.threadingmyway.com/
MarchWonky PatchworkSallyhttp://wonkypatchwork.blogspot.co.uk/
AprilSLIK stitchesBentahttp://slikstitches.com/
MayPractically PippyKarenhttp://practicallypippy.blogspot.co.uk/
JuneCharly and Ben's Crafty CornerRuthhttp://benandcharlyscorner.blogspot.co.uk/
JulyWeekend DoingsMarthawww.weekenddoings.blogspot.com

Patch the GiraffeChelseahttp://patchthegiraffe.blogspot.com/
AugustSunshine Through the RainDeborah http://sunshinethroughtherain-deborah.blogspot.co.uk/
SeptemberPractically PippyKarenhttp://practicallypippy.blogspot.co.uk/

Party of Eight: Our StoryGinahttp://partyofeightourstory.blogspot.co.uk/
OctoberElla and Nesta's Little RoomNesta http://ellaandnesta.blogspot.co.uk/
NovemberRose & DahliaJoannehttp://rosedahlia.blogspot.co.uk/
DecemberMud, Pies and PinsPaulahttp://www.mudpiesandpins.com/

If you look careful at that list, at just about now, you'll see someone called Benta at SLIKstitches is due to share a Christmassy project . . . so I guess I'd better get on with it!

I have made a calorie free Advent Calendar - after years of chocolate ones when the girls were younger I think this one is much kinder to my waistline!
 

I used 1/2 yard each of three fabrics, plus extra to bind.  I used fabric that had been cut into charm squares (5"x5").

FOR THE COUNTDOWN NUMBERS
If you are using yardage, initially cut 12 squares from one fabric, and applique, embroider or use fabric pens to add the numbers 0 to 9, plus an extra 1 and 2.  If you choose to use bondaweb, or heat&bond or similar you probably wont need to stitch them down.  I am lucky enough to have an embroidery machine so mine have been machine appliqued.  Make another piece, a rectangle this time, twice the size, with the word "sleeps" on it using the same method

Starting with 1 and 2, place the two numbered pieces right sides together.  Pin two sections of thin ribbon a little bit in from the top corners to make the hanging loops.  These need to be *between* the two parts, touching the right side of both fabrics, hanging inside (so you can see the bits shown here in black, but the grey section isn't visible unless you look between the two pieces of fabric)


 Stitch most of the way round (including all 4 corners), but leave an opening for turning

Stuff with a handful of toy stuffing and then stitch the opening closed.  Continue with the other numbers, pairing 3 & 4, 5 & 6, 7 & 8, 9 & 0, and another 1 & 2 and finally pair "sleeps" with another piece of fabric
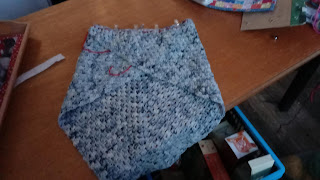
FOR THE WALL HANGING:
As I had charm squares I used six greens charms along the top and bottom, and I used a green, four creams and another green for each of the middle rows (16 greens and 8 creams in total), but you could use yardage or scraps.  Mine finished at about 27 x 17½" 

I spray basted it onto wadding (batting) with more fabric on the back, and quilted it with free range lines from left to right.  I used green thread for the green areas and cream for the cream areas

I arranged two number 'cushions' and the 'sleeps' cushion to a suitable place in the centre panel and marked where the top of the ribbons should be, and I stitched buttons in the right places.  
 
I also added six pairs on buttons below to park the unused cushions

I folded two charm squares in half diagonally and basted them in the top right and top left hand corners.  I then added the binding to the wall hanging including the triangle edges.

I could then use a stick the same width to hang it on my display hanger


TIPS FOR SEWING ON A BUTTON:


Start with one piece of thread, but thread both ends through the needle.


This means you can use the loop at the end to anchor the thread - no knot required


You want a bit of space behind the button, to allow the ribbon to fall snugly behind it.  You can create this by including a pin on top of the button while you are sewing.  Stitch from hole to hole half a dozen times over the pin


Then remove the pin and wrap the end of the thread around several times, between the button and the cloth, to create a shank.  Knot the thread on the back and hide the ends in the fabric


Now the ribbon will fall easily behind the button.


WHAT DID I LEARN?
I used elastic to hang up my little cushions - and I'm suggesting you use ribbon.  It seems the needle takes the path of least resistance and that will be either side of the elastic, not through it, so any pressure on the elastic will cause it to pop out!

FINALLY

If you are inspired by this or any other Ho Ho Ho and On We Sew post, do link up with Fiona and Paula - there are goodies to be won!!!

I have had major issues with adding the links - Fiona has been very patient but I.Just.Don't.Get.It!!!  This post is set to go live at midnight my time so I wont be checking it until 8 or so hours after that.  If the following looks fab, it's thanks to Fiona - if it looks like gobbledegook? Blame me!


This month's linkup is kindly sponsored, thank you very much, by

and the fab prize is this:


Thanks to all the regular sponsors too


Thank you to Fiona and Paula and all the other Ho Ho Ho-ers

April 2026

 Welcome to my April furtle My orange car was replaced by a seafoam green car: our first brand new car, and our first all electric car: quit...